Chapter 39 Git and GitHub
Here we provide some details on Git and GitHub. However, we are only scratching the surface. To learn more about this topic, we highly recommend the following resources:
- Codeacademy: https://www.codecademy.com/learn/learn-git
- GitHub Guides: https://guides.github.com/activities/hello-world/
- Try Git tutorial: https://try.github.io/levels/1/challenges/1
- Happy Git and GitHub for the useR: http://happygitwithr.com/
39.1 Why use Git and GitHub?
There are three main reasons to use Git and GitHub.
Sharing: Even if we do not take advantage of the advanced and powerful version control functionality, we can still use Git and GitHub to share our code.
Collaborating: Once you set up a central repo, you can have multiple people make changes to code and keep versions synched. GitHub provides a free service for centralized repos. GitHub also has a special utility, called a pull request, that can be used by anybody to suggest changes to your code. You can easily either accept or deny the request.
Version control: The version control capabilities of Git permit us to keep track of changes we make to our code. We can also revert back to previous versions of files. Git also permits us to create branches in which we can test out ideas, then decide if we merge the new branch with the original.
Here we focus on the sharing aspects of Git and GitHub and refer the reader to the links above to learn more about this powerful tool.
39.2 GitHub accounts
After installing git120, the first step is to get a GitHub account. Basic GitHub accounts are free. To do this, go to GitHub where you will see a box in which you can sign up.
You want to pick a name carefully. It should be short, easy to remember and to spell, somehow related to your name, and professional. This last one is important since you might be sending potential employers a link to your GitHub account. In the example below, I am sacrificing on the ease of spelling to incorporate my name. Your initials and last name are usually a good choice. If you have a very common name, then this may have to be taken into account. A simple solution would be to add numbers or spell out part of your name.
The account I use for my research, rafalab, is the same one I use for my webpage121 and Twitter122, which makes it easy to remember for those that follow my work.
Once you have a GitHub account, you are ready to connect Git and RStudio to this account.
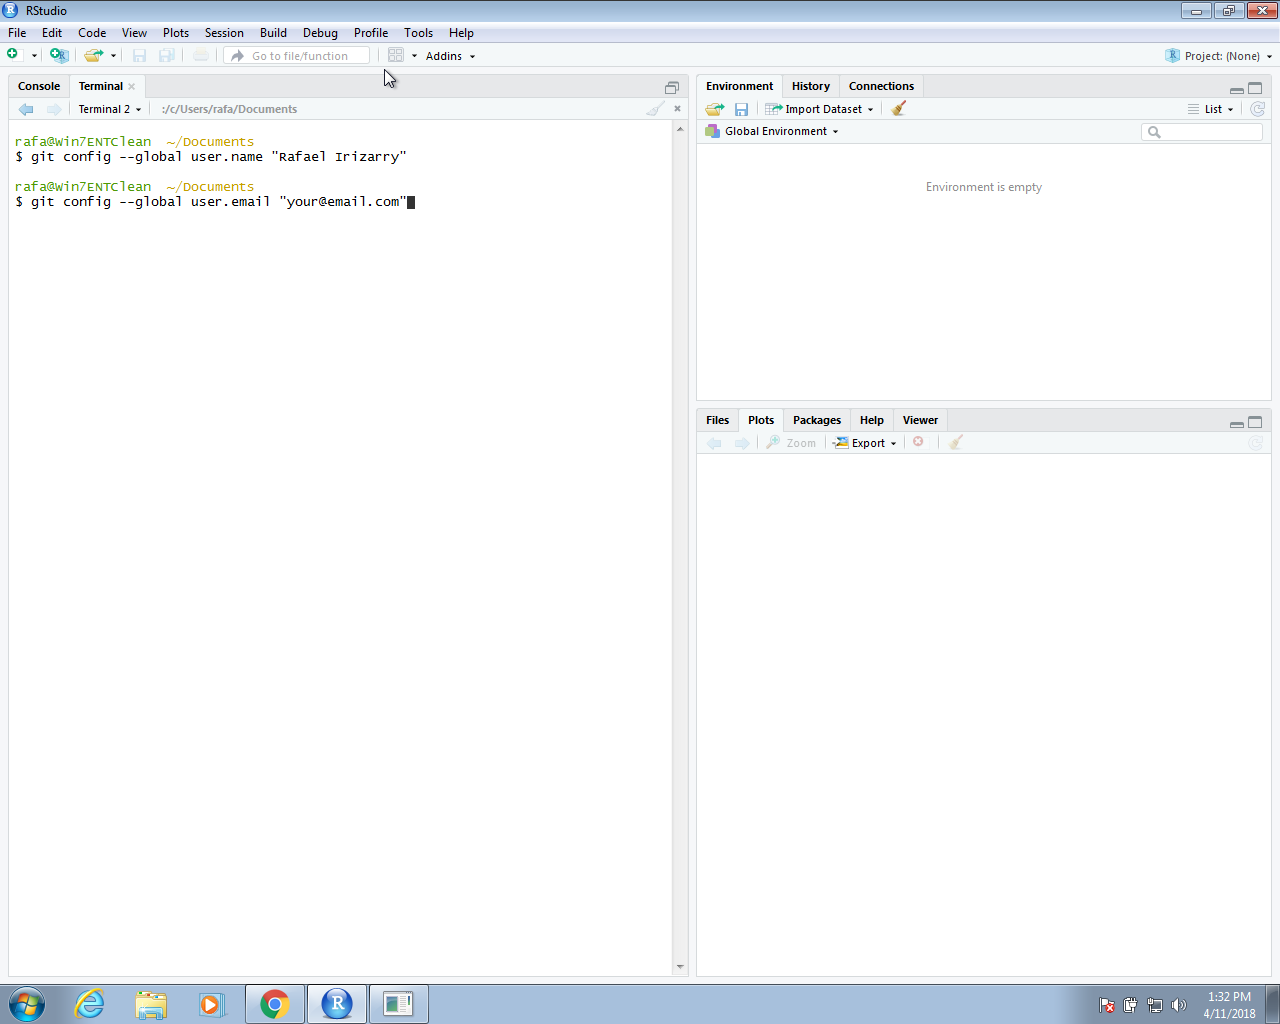
A first step is to let Git know who we are. This will make it easier to connect with GitHub. We start by opening a terminal window in RStudio (remember you can get one through Tools in the menu bar). Now we use the git config command to tell Git who we are. We will type the following two commands in our terminal window:
You need to use the email account that you used to open your GitHub account. The RStudio session should look something like this:
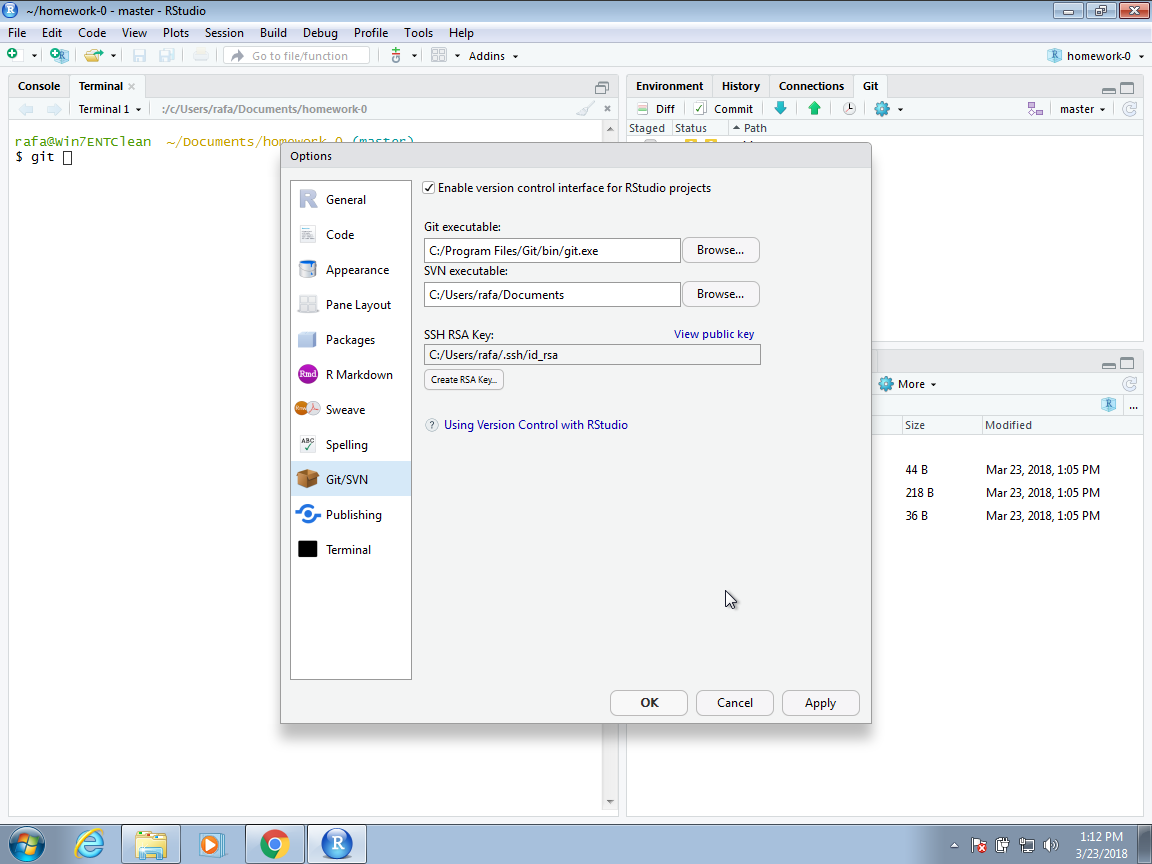
You start by going to the Global Options, selecting Git/SVN, and then you enter a path for the Git executable we just installed.
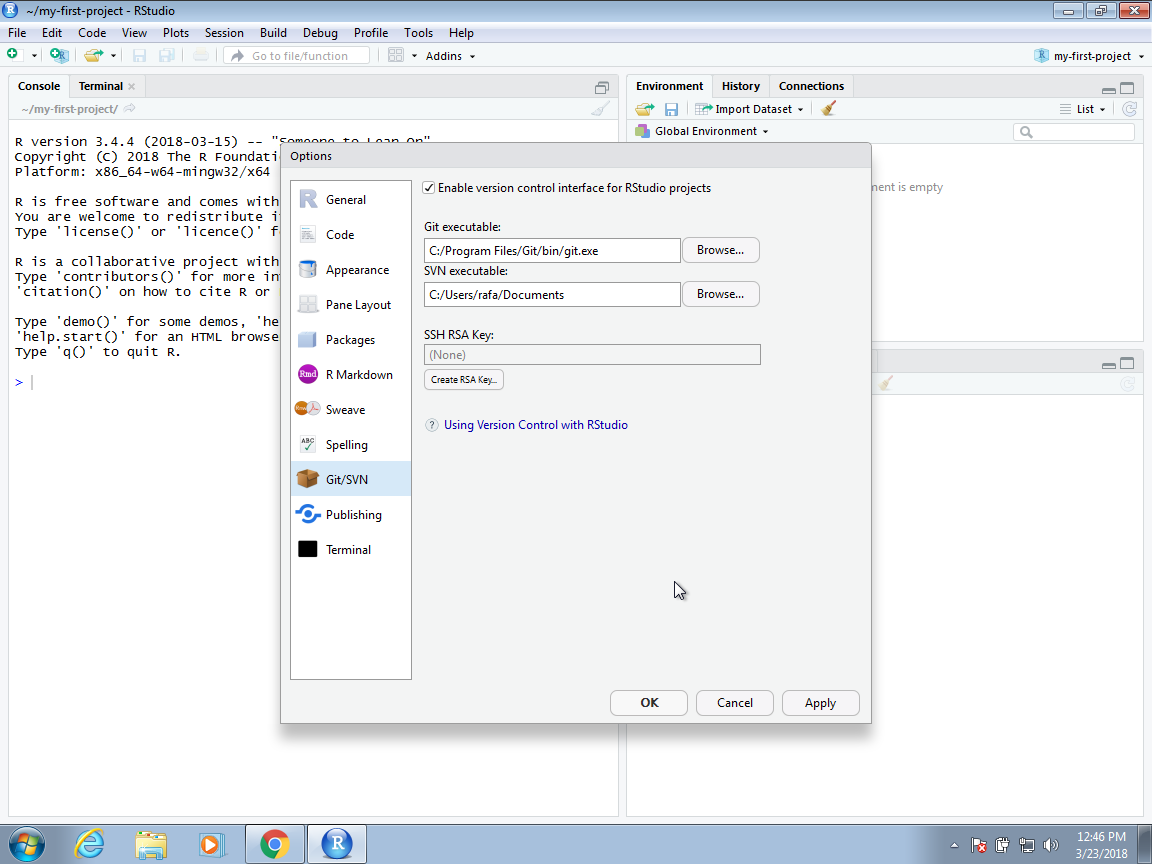
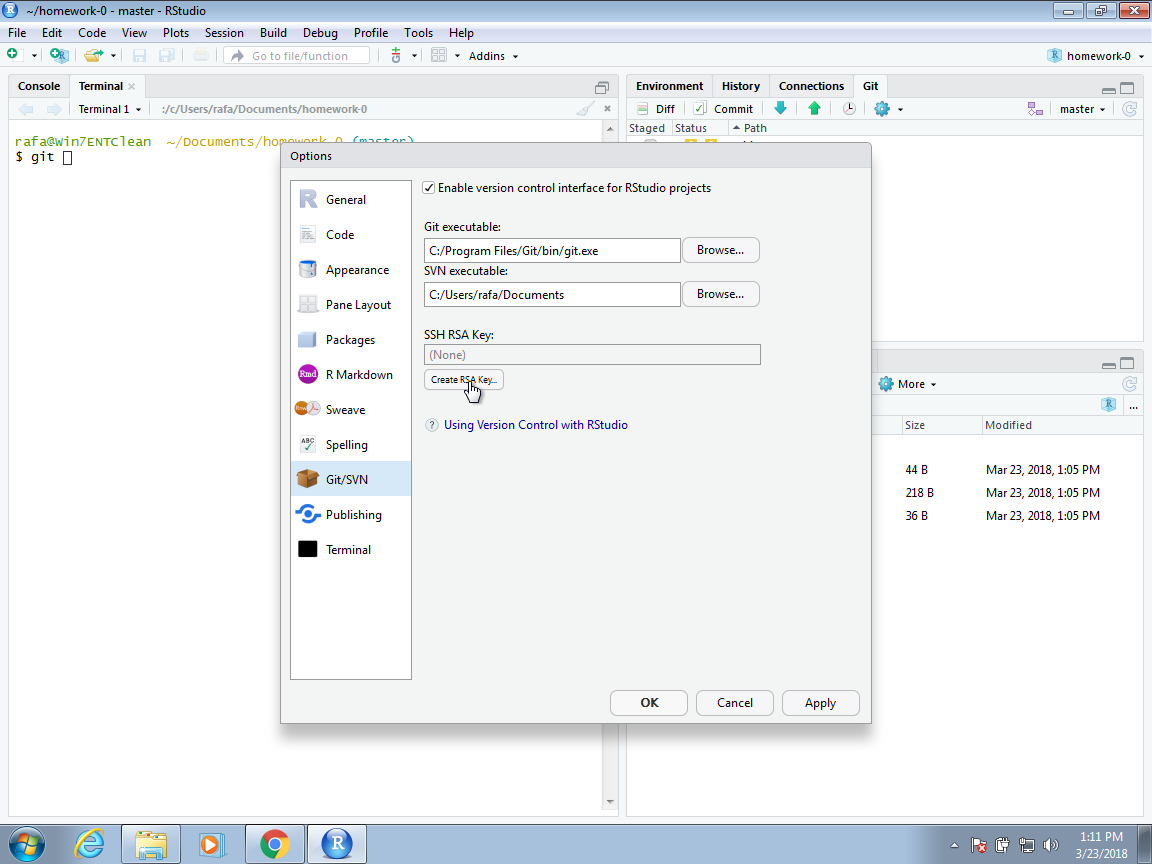
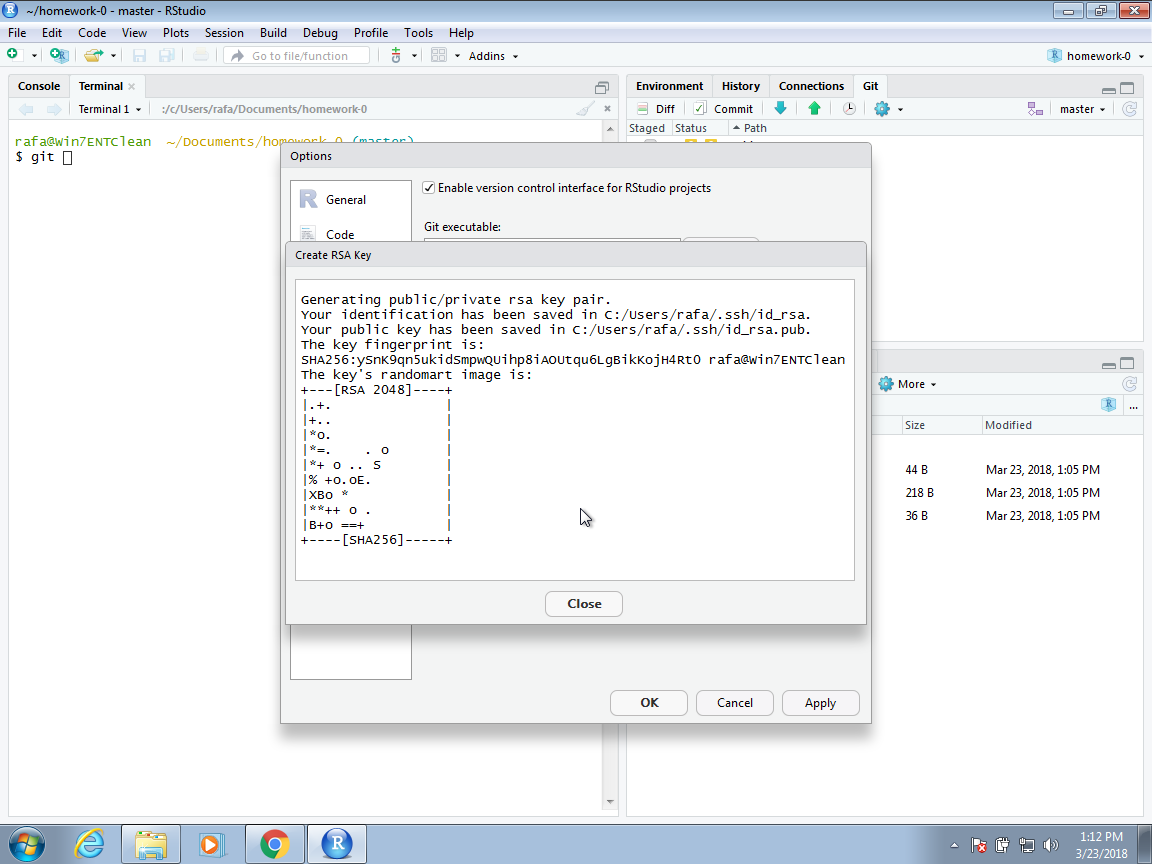
On the Windows default installation, this will be C:/Program File/Git/bin/git.exe, but you should find it by browsing your system as this can change from system to system. Now to avoid entering our GitHub password every time we try to access our repository, we will create what is called an SSH RSA Key. RStudio can do this for us automatically if we click on the Create RSA Key button:
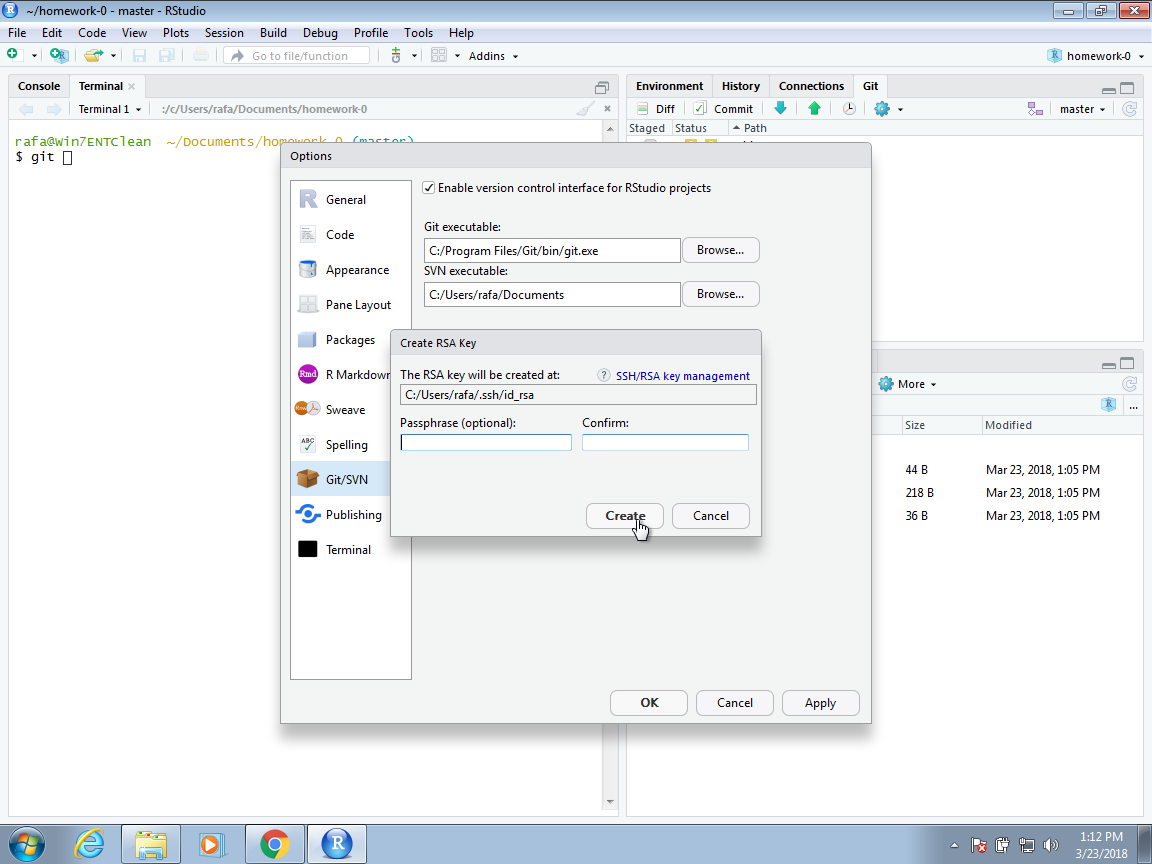
You can follow the default instructions as shown below:
Git, RStudio and GitHub should now be able to connect and we are ready to create a first GitHub code repository.
39.3 GitHub repositories
You are now ready to create a GitHub repository (repo). The general idea is that you will have at least two copies of your code: one on your computer and one on GitHub. If you add collaborators to this project, then each will have a copy on their computer. The GitHub copy is usually considered the main (previously called master) copy that each collaborator syncs to. Git will help you keep all the different copies synced.
As mentioned, one of the advantages of keeping code on a GitHub repository is that you can easily share it with potential employers interested in seeing examples of your work. Because many data science companies use version control systems, like Git, to collaborate on projects, they might also be impressed that you already know at least the basics.
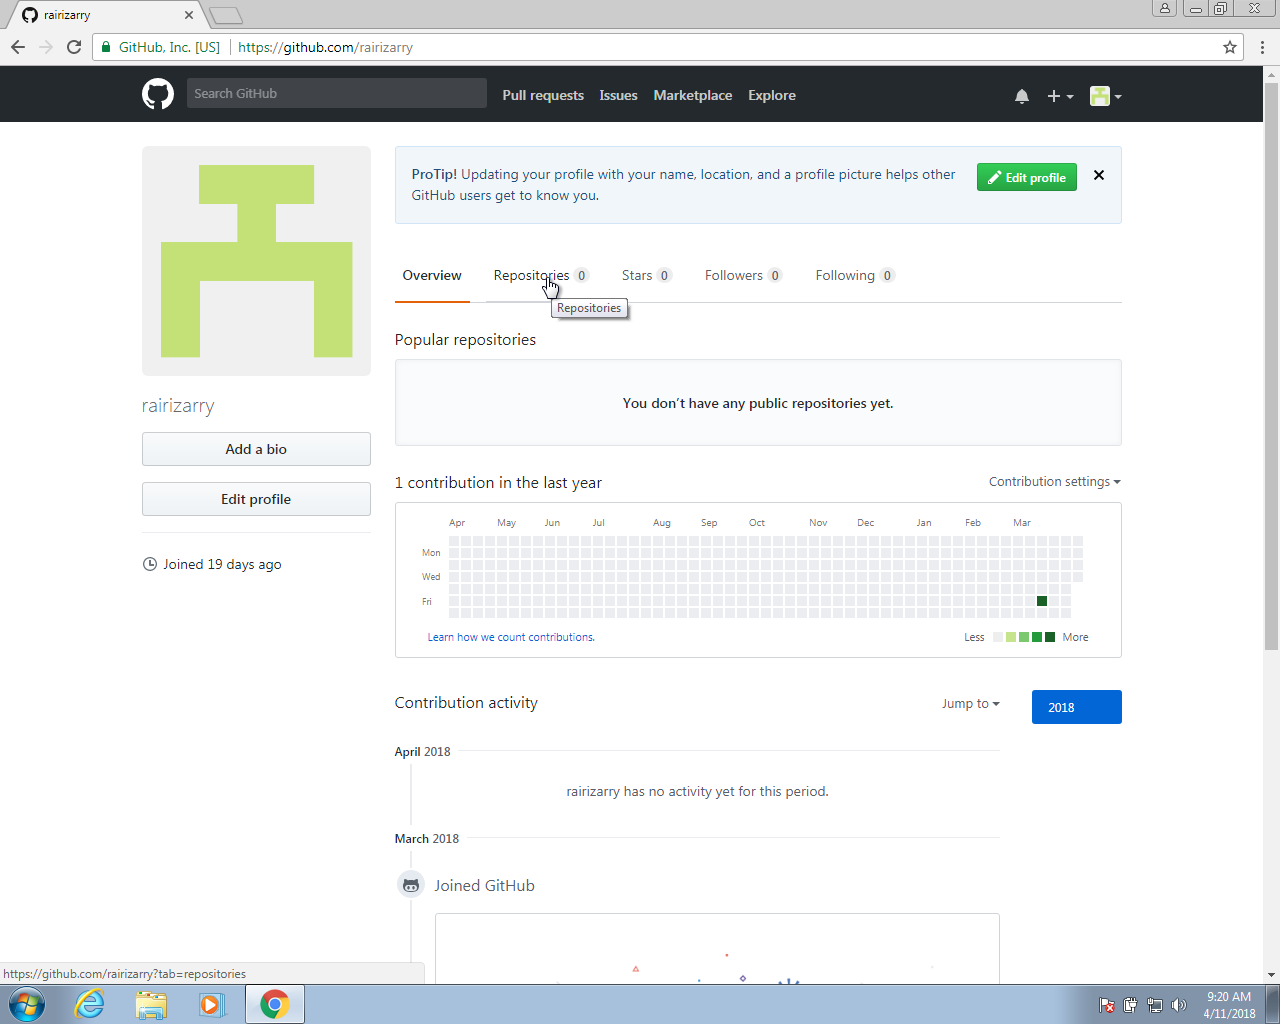
The first step in creating a repo for your code is to initialize on GitHub. Because you already created an account, you will have a page on GitHub with the URL http://github.com/username.
To create a repo, first log in to your account by clicking the Sign In button on https://github.com. You might already be signed in, in which case the Sign In button will not show up. If signing in, you will have to enter your username and password. We recommend you set up your browser to remember this to avoid typing it in each time.
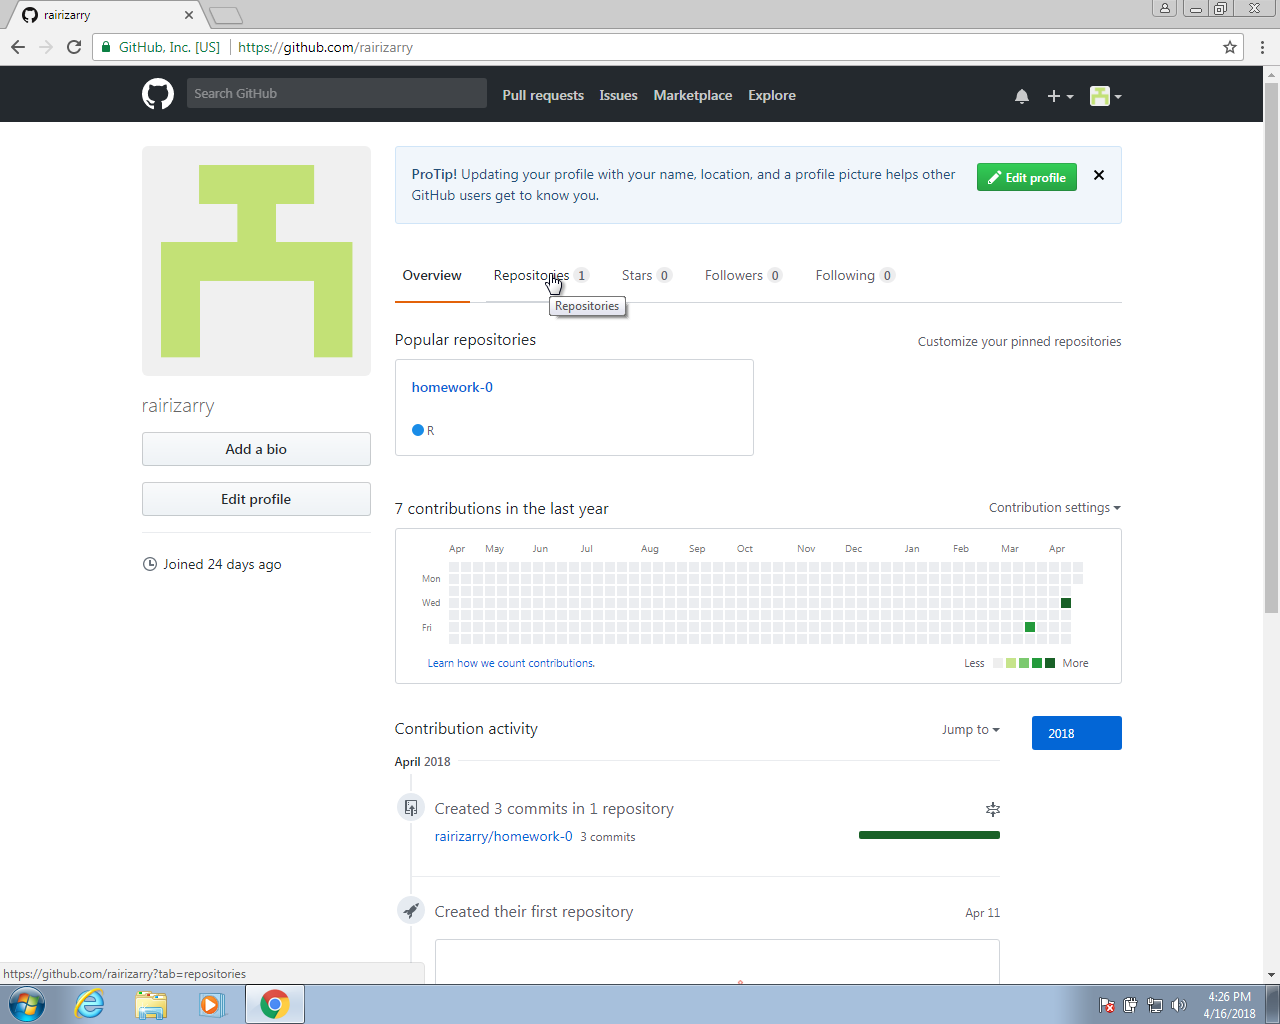
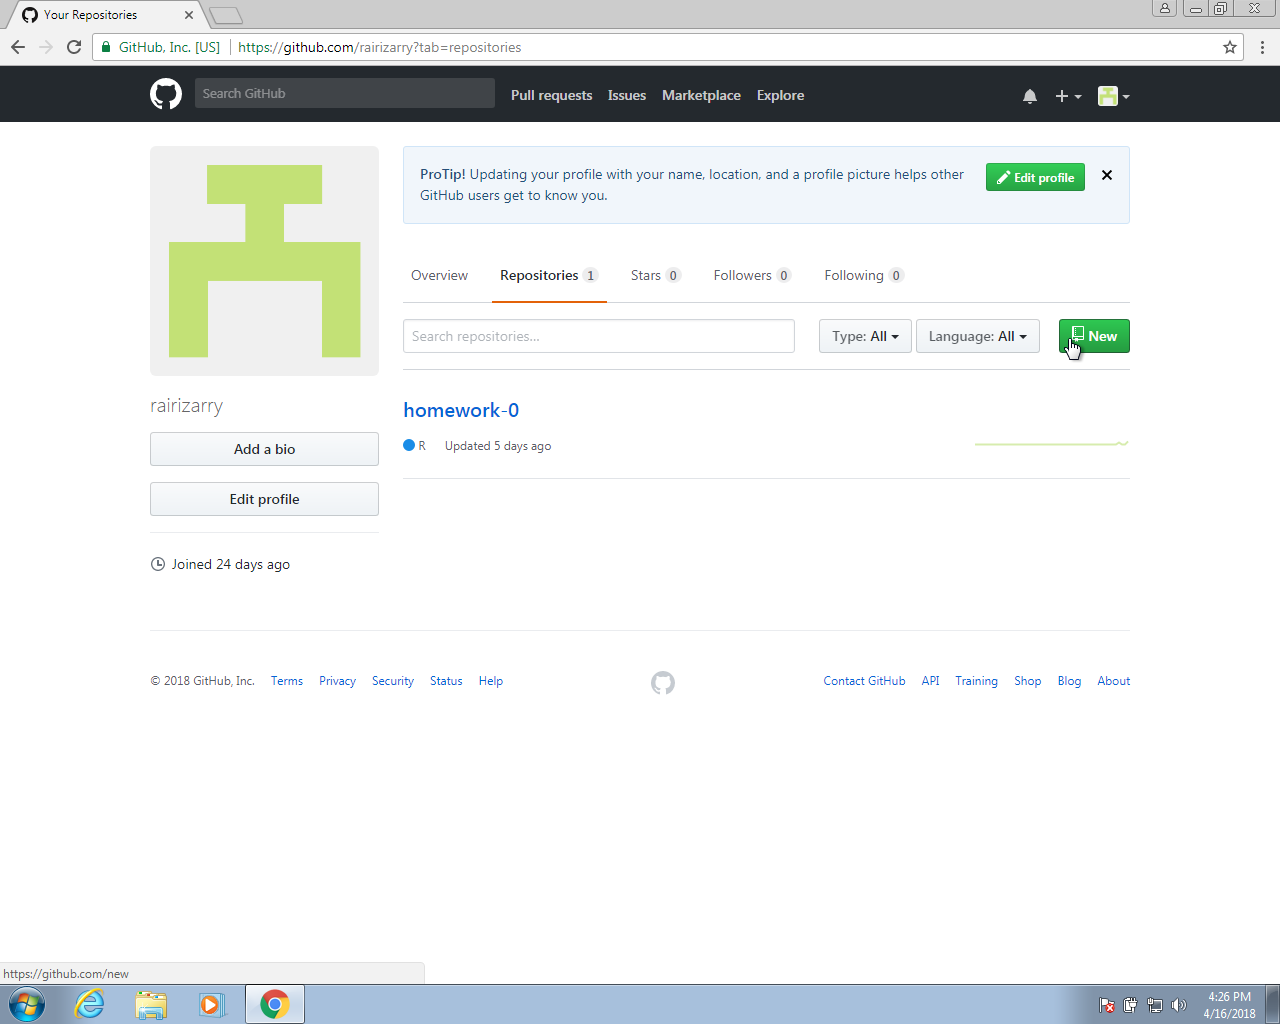
Once on your account, you can click on Repositories and then click on New to create a new repo:
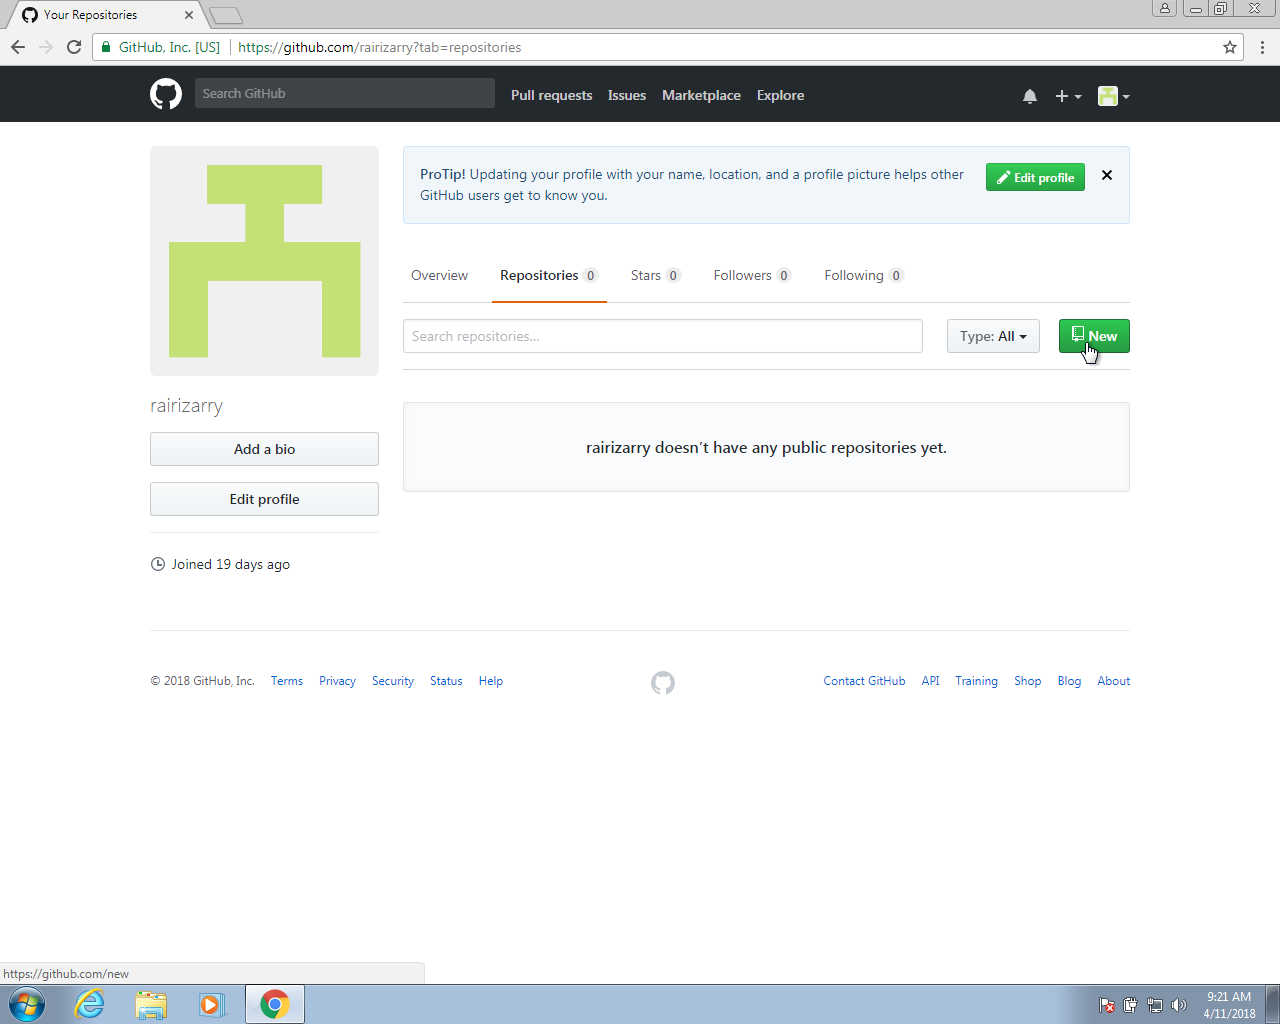
You will then want to choose a good descriptive name for the project. In the future, you might have dozens of repos so keep that in mind when choosing a name. Here we will use homework-0. We recommend you make the repo public. If you want to keep it private, you will have to pay a monthly charge.

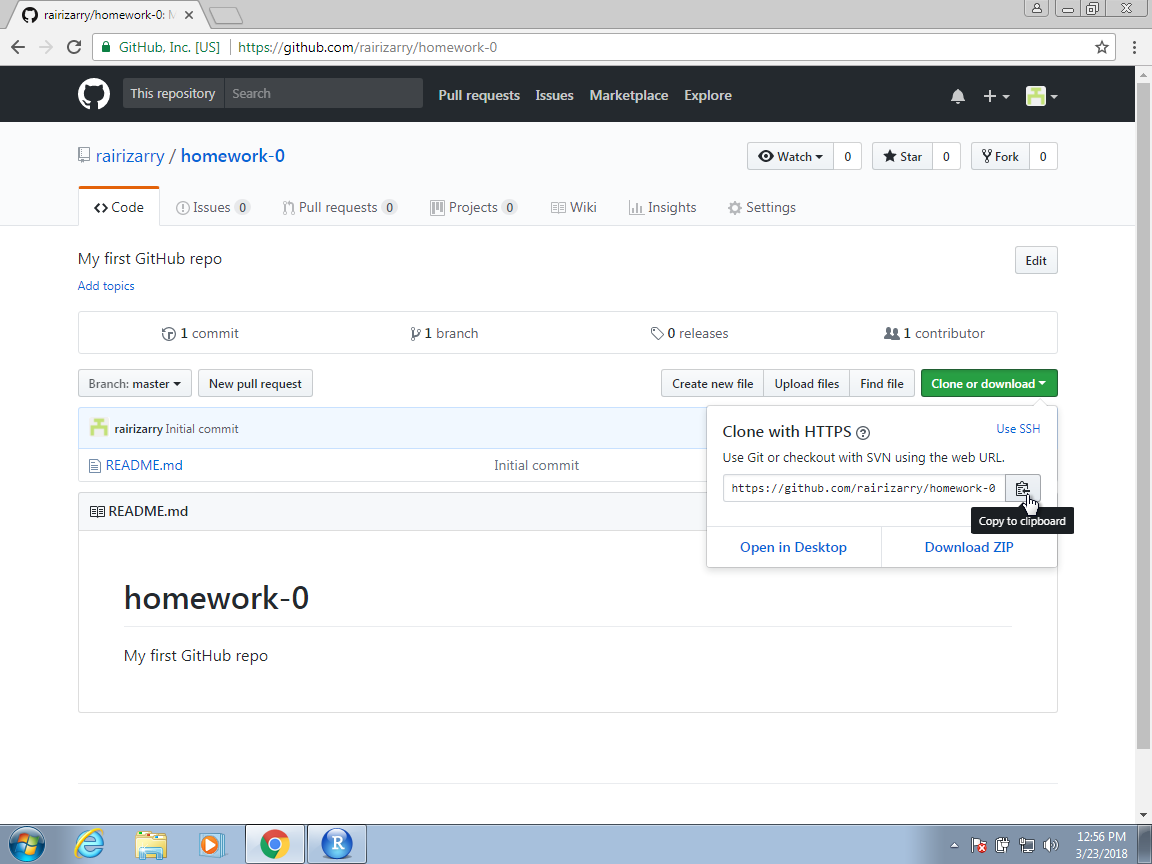
You now have your first repo on GitHub. The next step will be to clone it on your computer and start editing and syncing using Git.
To do this, it is convenient to copy the link provided by GitHub specifically to connect to this repo, using Git as shown below. We will later need to copy and paste this so make sure to remember this step.
39.4 Overview of Git
The main actions in Git are to:
- pull changes from the remote repo, in this case the GitHub repo
- add files, or as we say in the Git lingo stage files
- commit changes to the local repo
- push changes to the remote repo, in our case the GitHub repo
To effectively permit version control and collaboration in Git, files move across four different areas:

But how does it all get started? There are two ways: we can clone an existing repo or initialize one. We will explore cloning first.
39.4.1 Clone
We are going to clone an existing Upstream Repository. You can see it on GitHub here: https://github.com/rairizarry/murders. By visiting this page, you can see multiple files and directories. This is the Upstream Repository. By clicking the green clone button, we can copy the repo’s URL https://github.com/rairizarry/murders.git.
But what does clone mean? Rather than download all these files to your computer, we are going to actually copy the entire Git structure, which means we will add the files and directories to each of the three local stages: Working Directory, Staging Area, and Local Repository. When you clone, all three are exactly the same to start.
You can quickly see an example of this by doing the following. Open a terminal and type:
pwd
mkdir git-example
cd git-example
git clone https://github.com/rairizarry/murders.git
cd murders
#> /Users/rafa/myDocuments/teaching/data-science/dsbook
#> Cloning into 'murders'...
You now have cloned a GitHub repo and have a working Git directory, with all the files, on your system.
ls
#> README.txt
#> analysis.R
#> data
#> download-data.R
#> murders.Rproj
#> rdas
#> report.Rmd
#> report.md
#> report.qmd
#> report_files
#> wrangle-data.R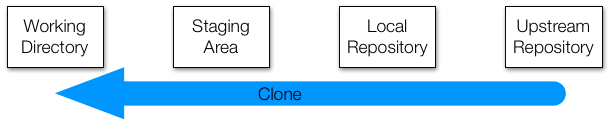
The Working Directory is the same as your Unix working directory. When you edit files using an editor such as RStudio, you change the files in this area and only in this area. Git can tell you how these files relate to the versions of the files in other areas with the command git status:

If you check the status now, you will see that nothing has changed and you get the following message:
git status
#> On branch master
#> Your branch is up to date with 'origin/master'.
#>
#> nothing to commit, working tree clean
Now we are going to make changes to these files. Eventually, we want these new versions of the files to be tracked and synched with the upstream repo. But we don’t want to keep track of every little change: we don’t want to sync until we are sure these versions are final enough to share. For this reason, edits in the staging area are not kept by the version control system.
To demonstrate, we add a file to the staging area with the git add command. Below we create a file using the Unix echo command just as an example (in reality you would use RStudio):
We are also adding a temporary file that we do not want to track at all:
Now we can stage the file we eventually want to add to our repository:
Notice what the status says now:
git status
#> On branch master
#> Your branch is up to date with 'origin/master'.
#>
#> Changes to be committed:
#>   (use "git restore --staged <file>..." to unstage)
#>  new file:   new-file.txt
#>
#> Untracked files:
#>   (use "git add <file>..." to include in what will be committed)
#>  tmp.txt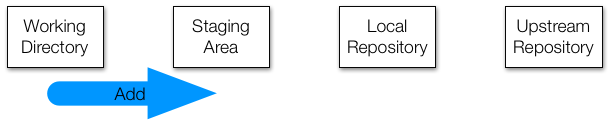
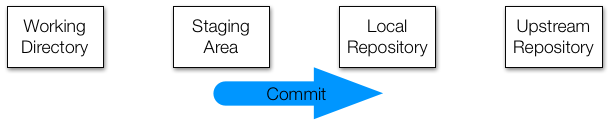
Because new-file.txt is staged, the current version of the file will get added to the local repository next time we commit, which we do as follows:
git commit -m "adding a new file"
#> [master 1abe842] adding a new file
#>  1 file changed, 1 insertion(+)
#>  create mode 100644 new-file.txt
We have now changed the local repo, which you can confirm using
However, if we edit that file again, it changes only in the working directory. To add to the local repo, we need to stage it and commit the changes that are added to the local repo:
echo "adding a line" >> new-file.txt
git add new-file.txt
git commit -m "adding a new line to new-file"
#> [master 4727066] adding a new line to new-file
#>  1 file changed, 1 insertion(+)
Note that this step is often unnecessary in our uses of Git. We can skip the staging part if we add the file name to the commit command like this:
echo "adding a second line" >> new-file.txt
git commit -m "minor change to new-file" new-file.txt
#> [master 804a46f] minor change to new-file
#>  1 file changed, 1 insertion(+)
We can keep track of all the changes we have made with:
git log new-file.txt
#> commit 804a46f999377adf52b7ab636303eee7a7458aae
#> Author: Rafael A Irizarry <rafa@ds.dfci.harvard.edu>
#> Date:   Thu Dec 21 12:35:29 2023 -0500
#>
#>     minor change to new-file
#>
#> commit 4727066811cc9b68b0b4848609c6be2866945a62
#> Author: Rafael A Irizarry <rafa@ds.dfci.harvard.edu>
#> Date:   Thu Dec 21 12:35:29 2023 -0500
#>
#>     adding a new line to new-file
#>
#> commit 1abe842293c2b4ac7e1434aff1d0c30b89d94165
#> Author: Rafael A Irizarry <rafa@ds.dfci.harvard.edu>
#> Date:   Thu Dec 21 12:35:29 2023 -0500
#>
#>     adding a new file
To keep everything synced, the final step is to push the changes to the upstream repo. This is done with the git push command like this:
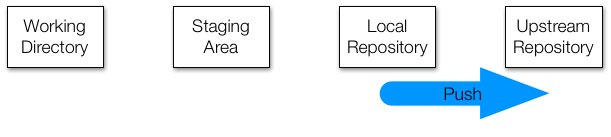
However, in this particular example, you will not be able to do this because you do not have permission to edit the upstream repo. If this was your repo, you could.
If this is a collaborative project, the upstream repo may change and become different than our version. To update our local repository to be like the upstream repo, we use the command fetch:
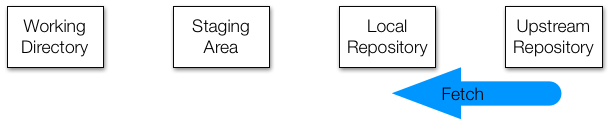
And then to make these copies to the staging area and working directory, we use the command:
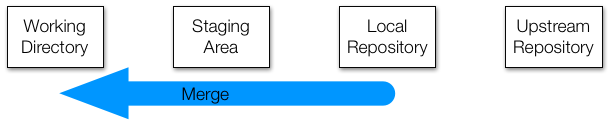
However, we often just want to change both with one command. For this, we use:
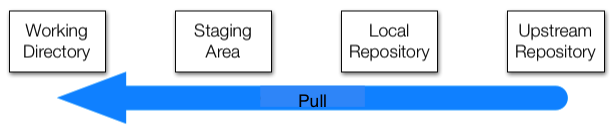
We will learn in Section 39.6 how RStudio has buttons to do all this. The details provided here should help you understand what happens in the background.
39.5 Initializing a Git directory
Now let’s learn the second way we can get started: by initializing a directory on our own computer rather than cloning.
Suppose we already have a populated local directory and we want to turn this directory into a collaborative GitHub repository. The most efficient way of achieving this is by initializing the local directory.
To demonstrate how to do this we will initialize the gun murders directory we created in Section 38.7. Note that we already created a directory with several subdirectories on our computer but we do not yet have a Git local repo or GitHub upstream repo.
We start by creating a new repo on our GitHub page. We click on the New button:
We call it murders here to match the name of the directory on our local system. But if you are doing this for another project, please choose an appropriate name.
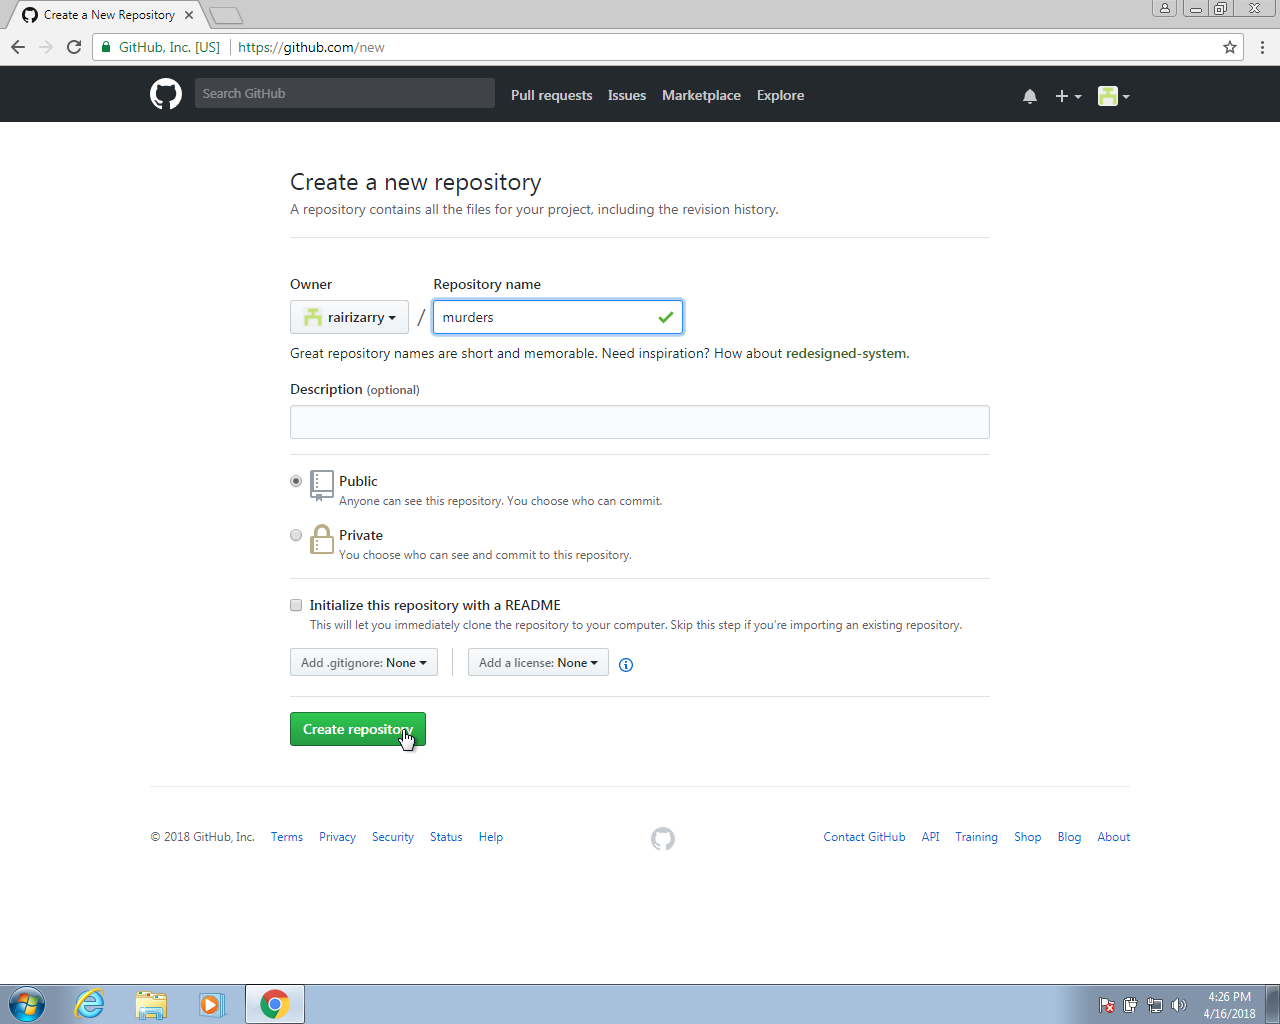
We then get a series of instructions on how to get started, but we can instead use what we have learned. The main thing we need from this page is to copy the repo’s URL, in this case: https://github.com/rairizarry/murders.git.
At this moment, we can start a terminal and cd into our local projects directory. In our example, it would be:
We then intialize the directory. This turns the directory into a Git directory and Git starts tracking:
All the files are now only in our working directory; no files are in our local repo or on GitHub.
The next step is to connect the local repo with the GitHub repo. In a previous example, we had RStudio do this for us. Now we need to do it ourselves. We can by adding any of the files and committing it:
We now have a file in our local repo and can connect it to the upstream repo, which has url: https://github.com/rairizarry/murders.git.
To do this, we use the command git remote add.
We can now use git push since there is a connection to an upstream repo:
In Section 40.3 we continue to work with this example, as we demonstrate how we can use RStudio to work with Git and keep a project synced on GitHub.
39.6 Using Git and GitHub in RStudio
While command line Git is a powerful and flexible tool, it can be somewhat daunting when we are getting started. RStudio provides a graphical interface that facilitates the use of Git in the context of a data analysis project. We describe how to use this RStudio feature to do this here.
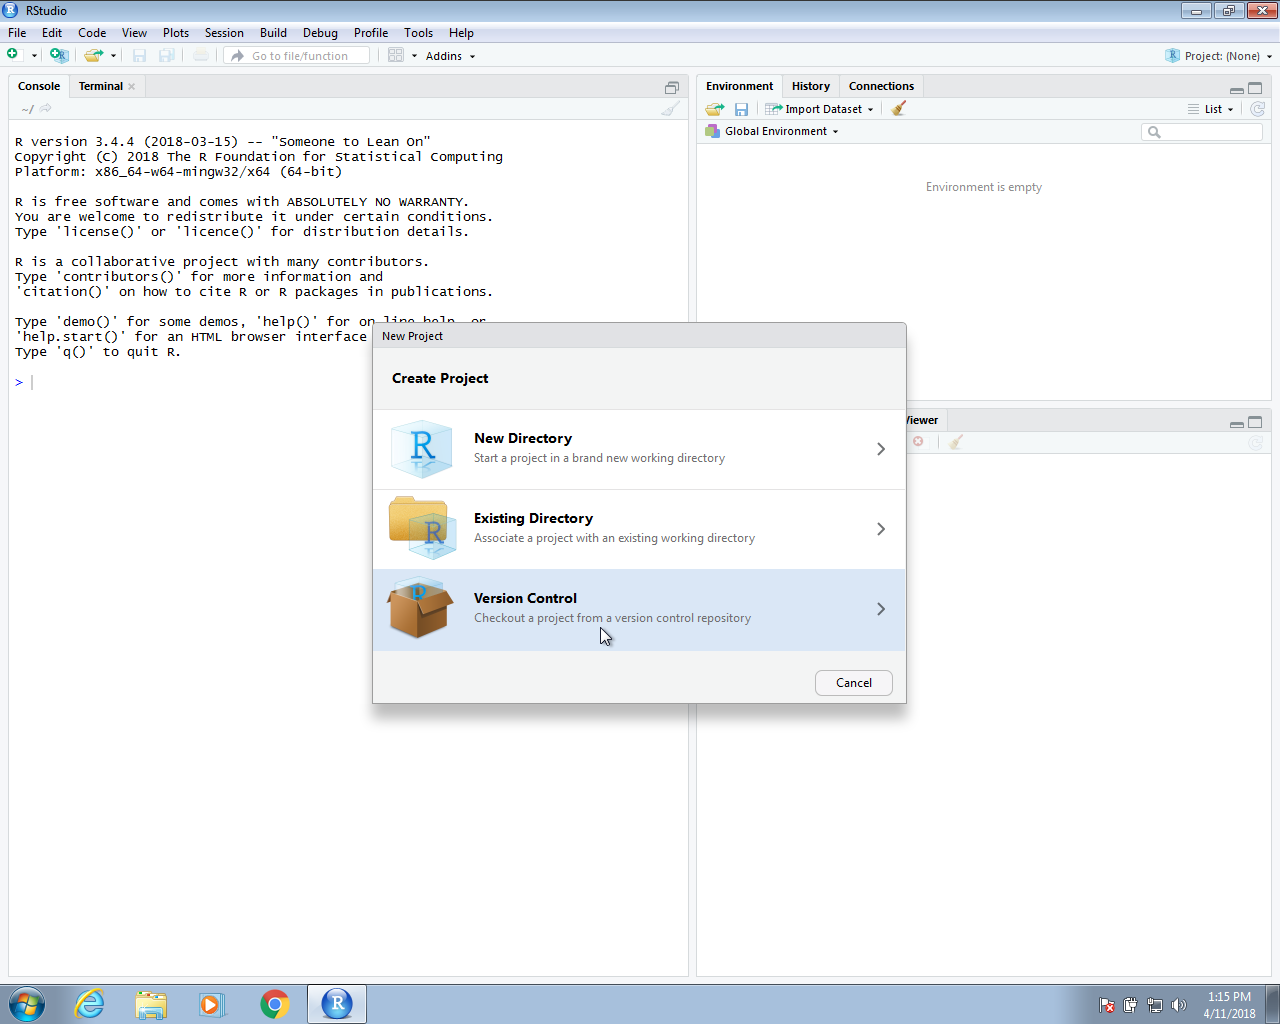
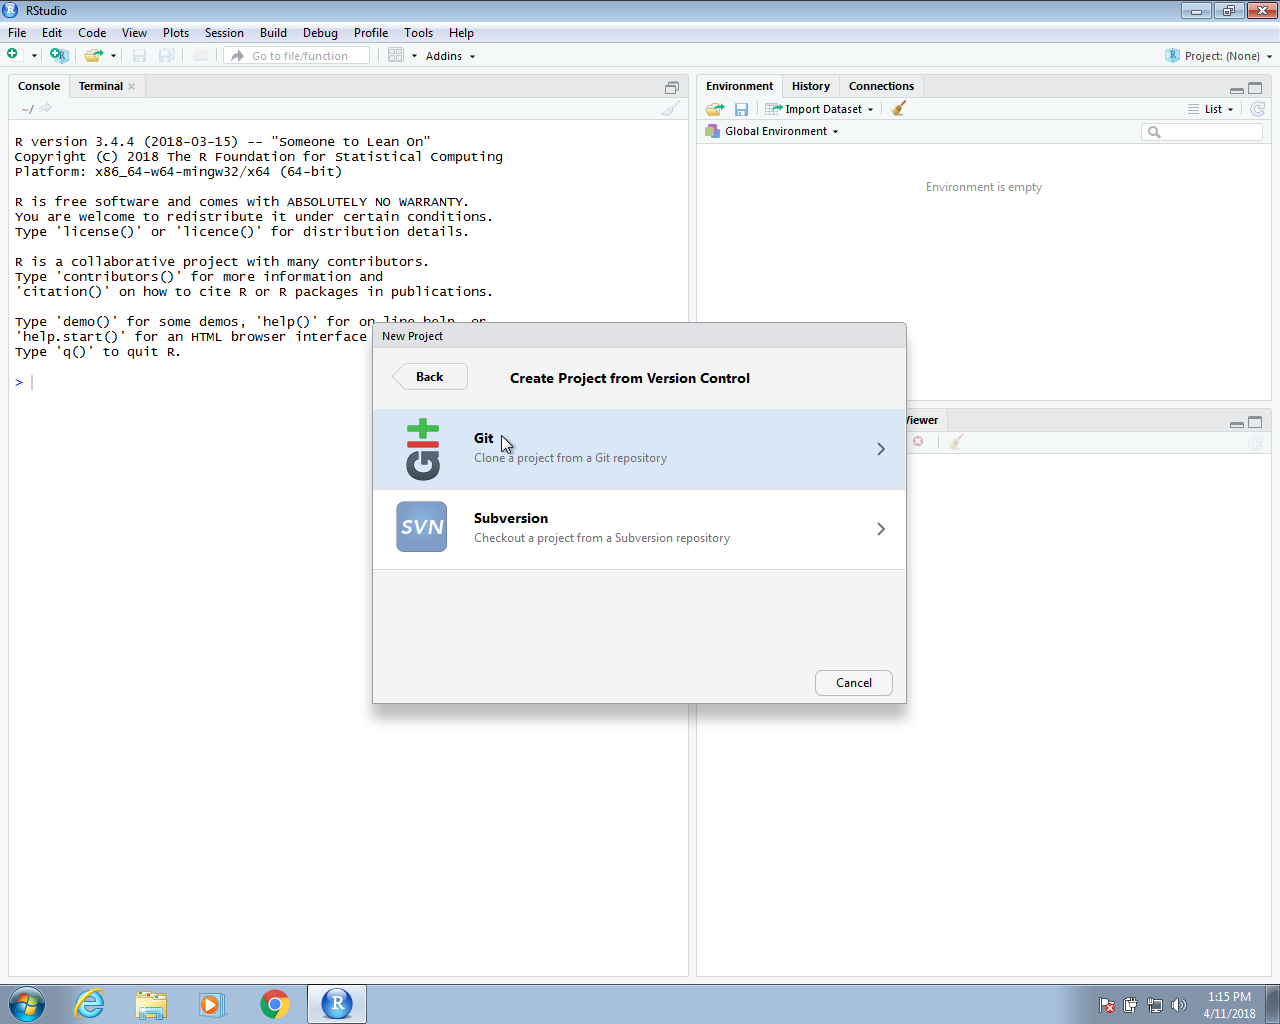
Now we are ready to start an RStudio project that uses version control and stores the code on a GitHub repo. To do this, we start a project but, instead of New Directory, we will select Version Control and then we will select Git as our version control system:
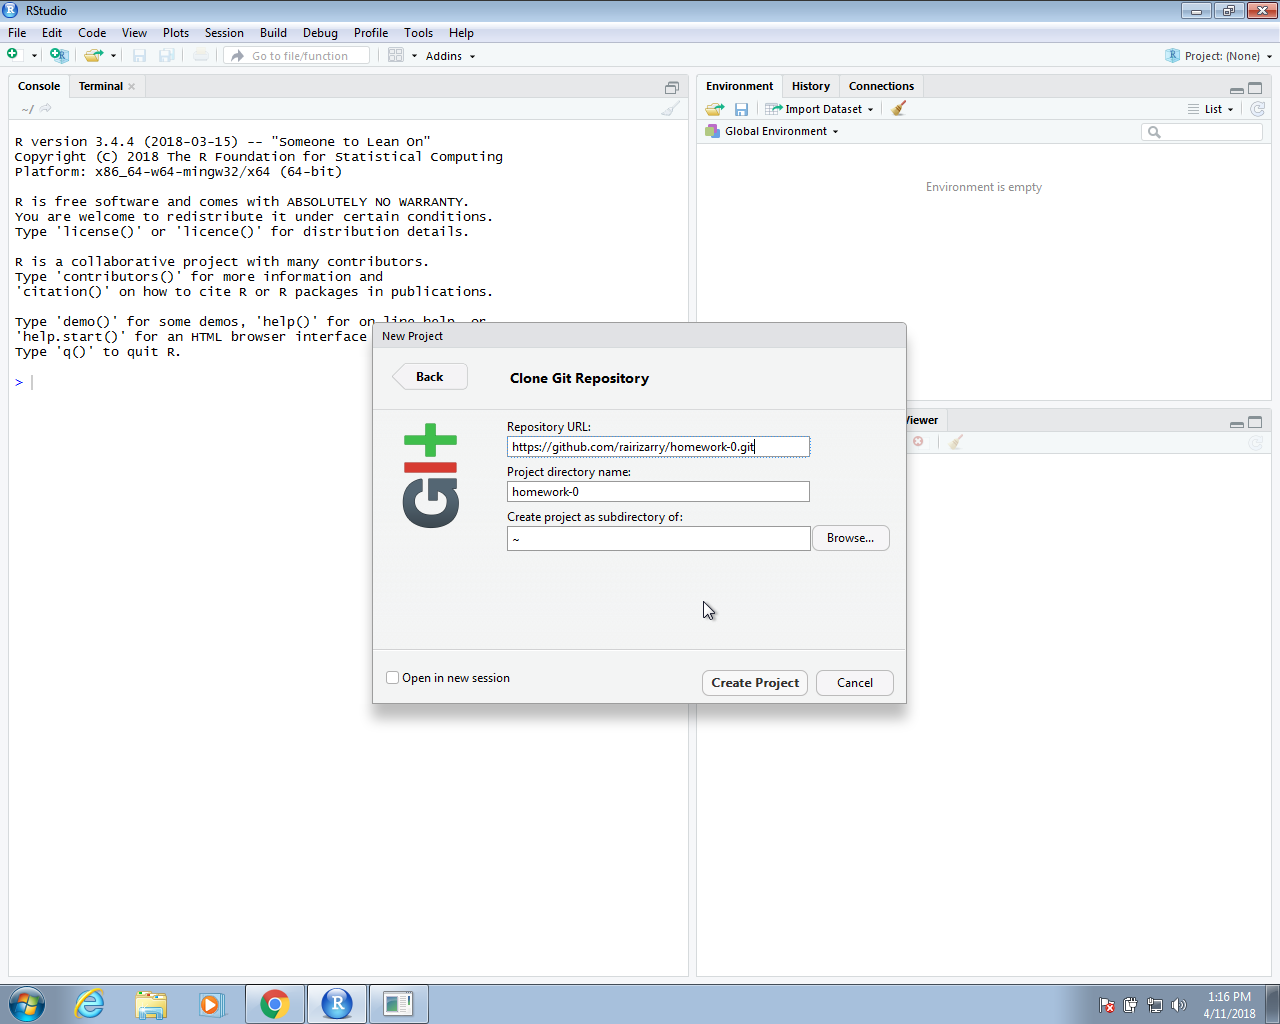
The repository URL is the link you used to clone. In Section 39.3, we used https://github.com/username/homework-0.git as an example. In the project directory name, you need to put the name of the folder that was generated, which in our example will be the name of the repo homework-0. This will create a folder called homework-0 on your local system. Once you do this, the project is created and it is aware of the connection to a GitHub repo. You will see on the top right corner the name and type of project as well as a new tab on the upper right pane titled Git.
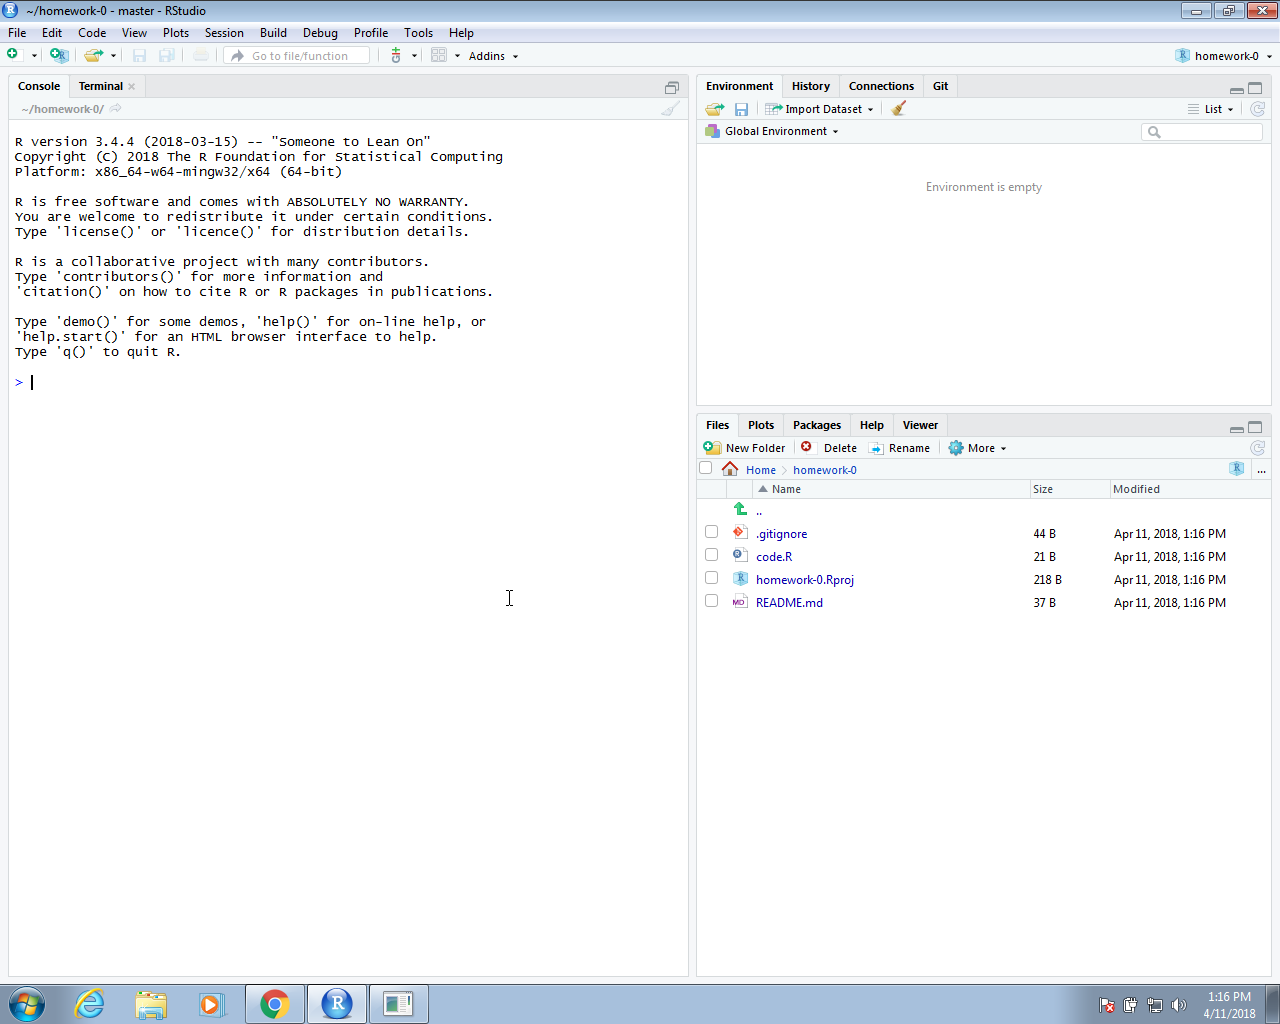
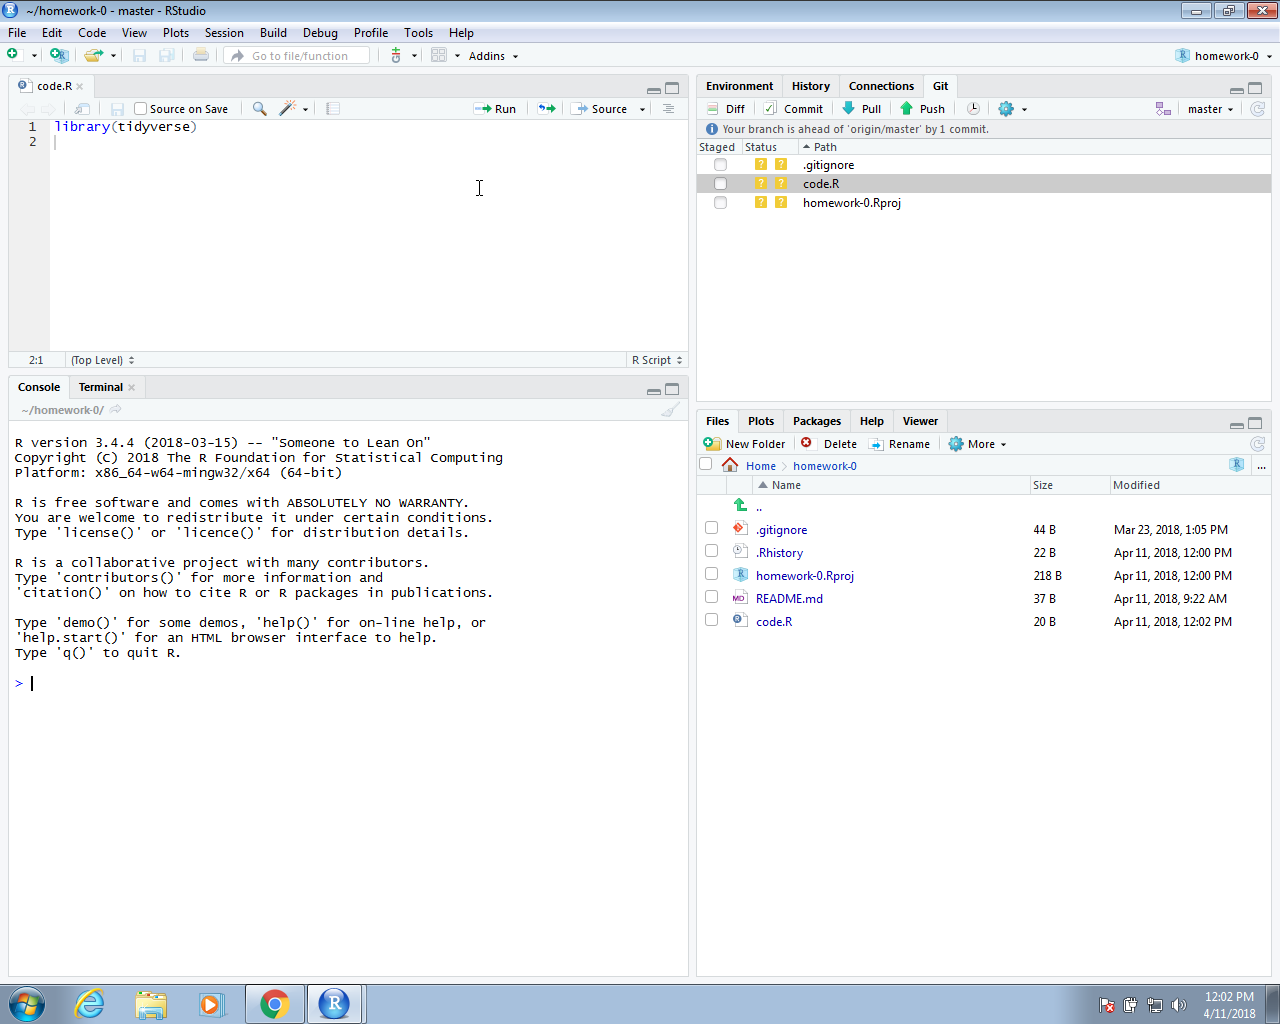
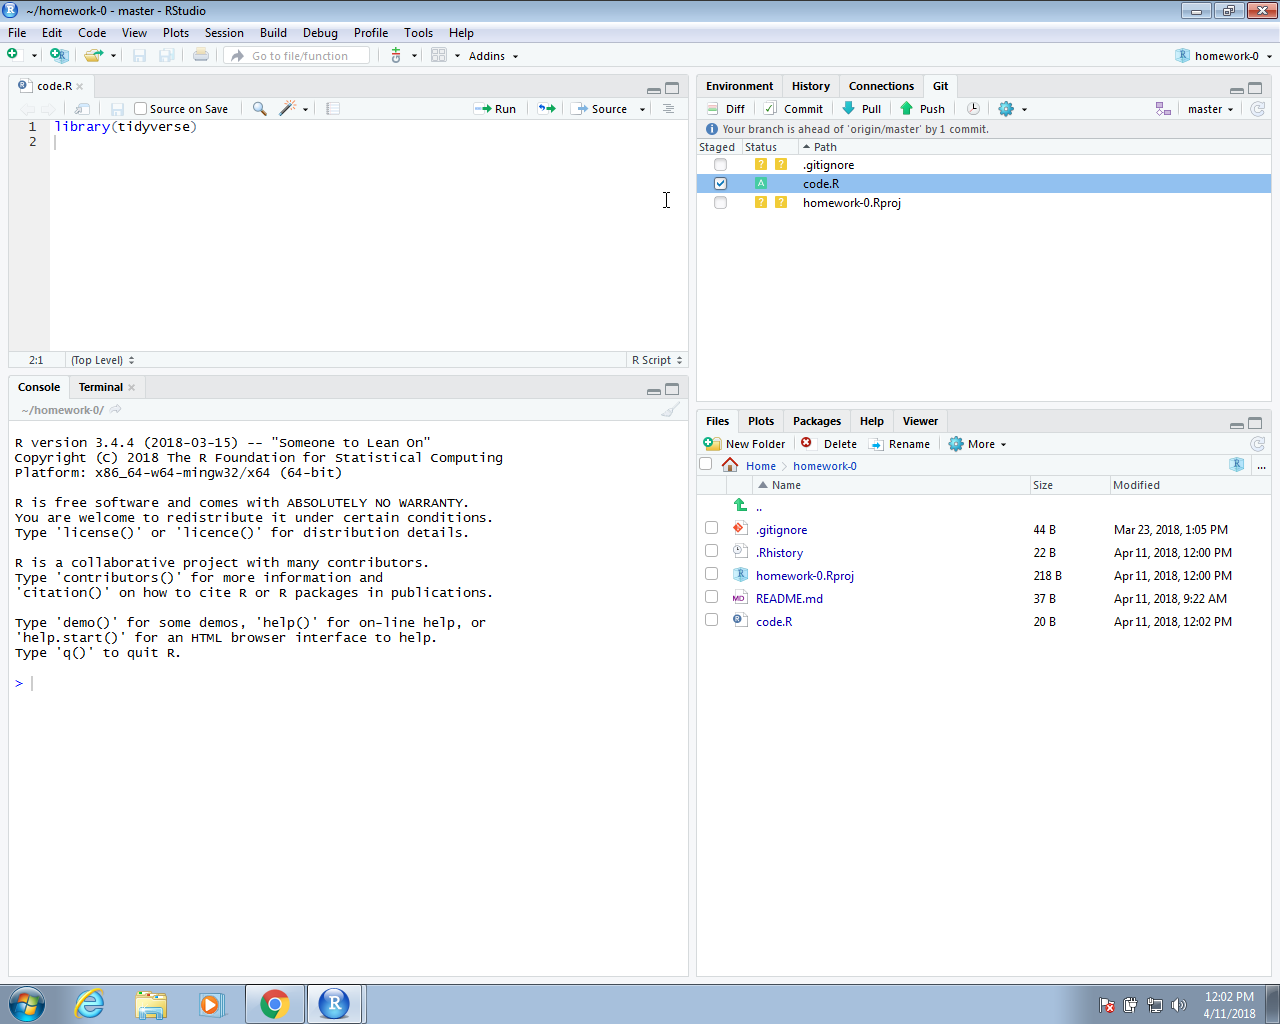
If you select this tab, it will show you the files on your project with some icons that give you information about these files and their relationship to the repo. In the example below, we already added a file to the folder, called code.R which you can see in the editing pane.
We now need to pay attention to the Git pane. It is important to know that your local files and the GitHub repo will not be synced automatically. As described in Section 39.4, you have to sync using git push when you are ready. We show you can do this through RStudio rather than the terminal below.
Before we start working on a collaborative project, usually the first thing we do is pull in the changes from the remote repo, in our case the one on GitHub. However, for the example shown here, since we are starting with an empty repo and we are the only ones making changes, we don’t need to start by pulling.
In RStudio, the status of the file as it relates to the remote and local repos are represented in the status symbols with colors. A yellow square means that Git knows nothing about this file. To sync with the GitHub repo, we need to add the file, then commit the change to our local Git repo, then push the change to the GitHub repo. Right now, the file is just on our computer. To add the file using RStudio, we click the Stage box. You will see that the status icon now changes to a green A.
Note: we are only adding the code.R file. We don’t necessarily need to add all the files in our local repo to the GitHub repo, only the ones we want to keep track of or the ones we want to share. If our work is producing files of a certain type that we do not want to keep track of, we can add the suffix that defines these files to the .gitignore file. More details on using .gitignore are included here: https://git-scm.com/docs/gitignore. These files will stop appearing in your RStudio Git pane. For the example shown here, we will only be adding code.R. But, in general, for an RStudio project, we recommend adding both the .gitignore and .Rproj files.
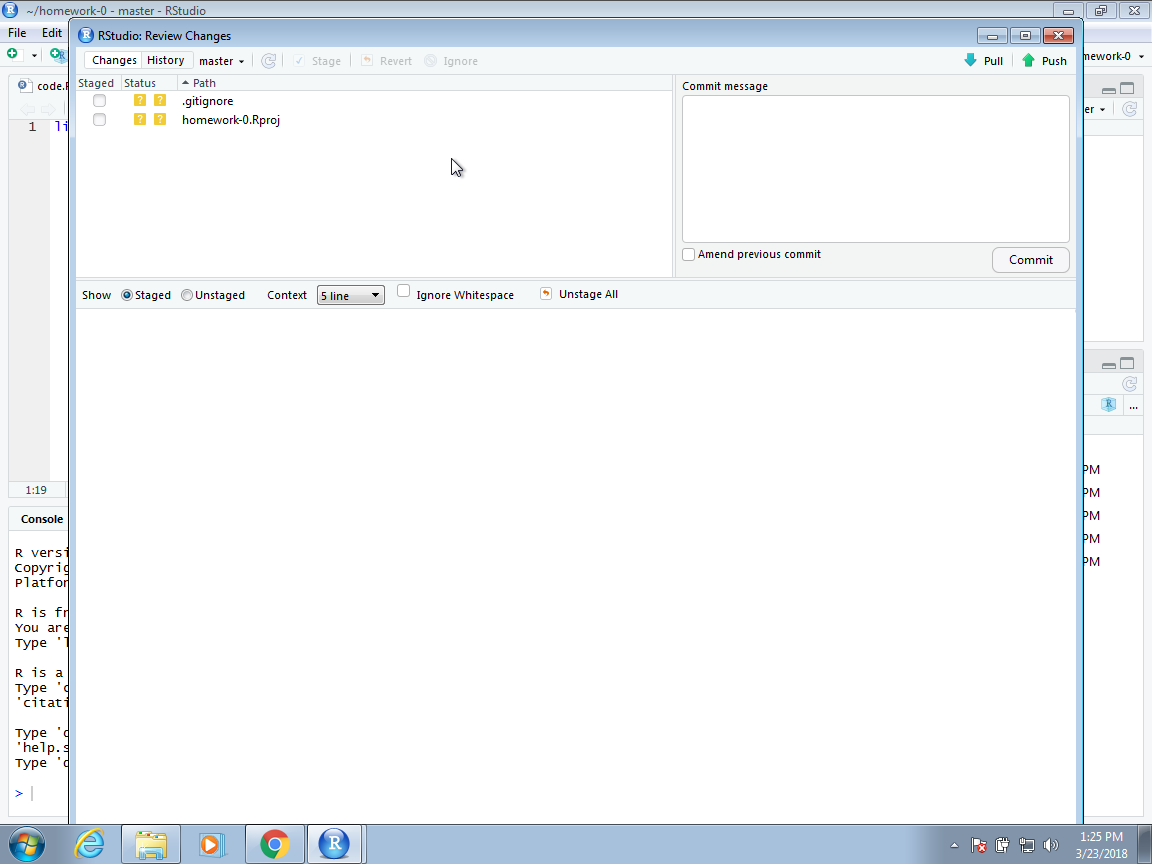
Now we are ready to commit the file to our local repo. In RStudio, we can use the Commit button. This will open a new dialog window. With Git, whenever we commit a change, we are required to enter a comment describing the changes being committed.
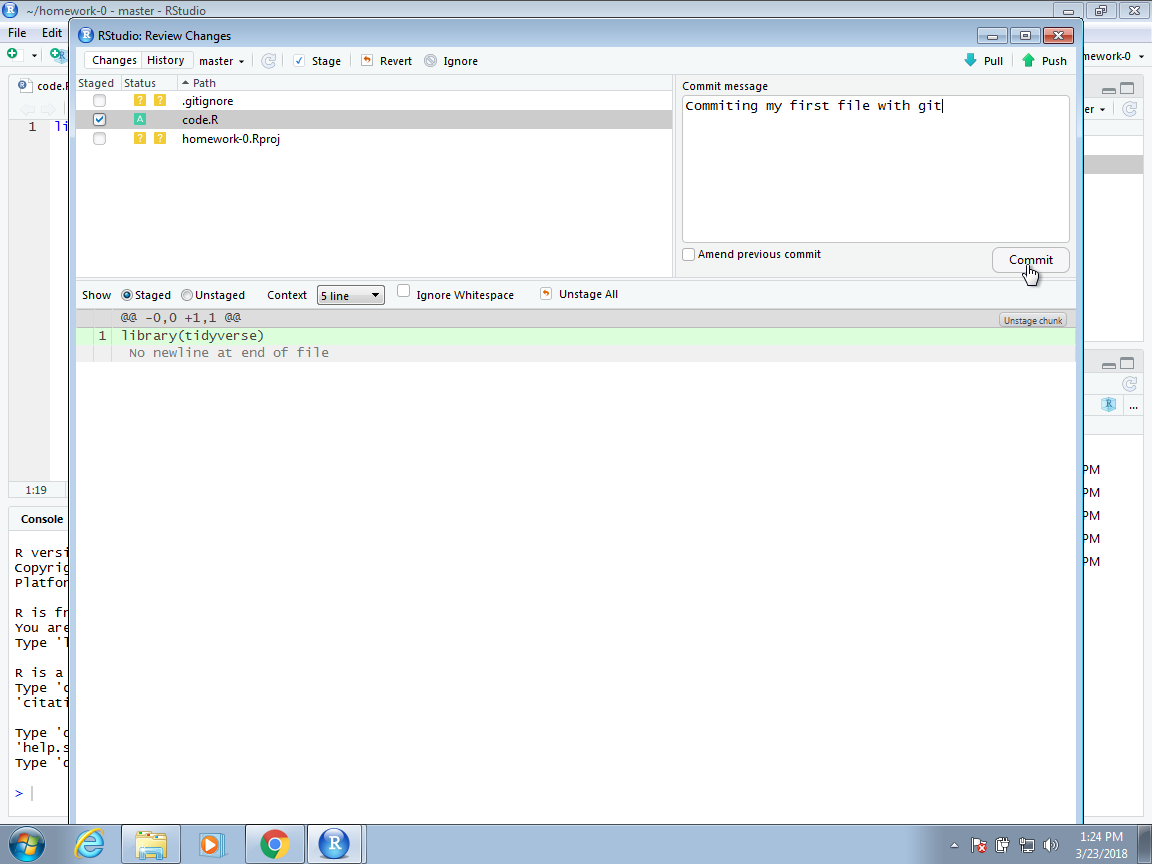
In this case, we will simply describe that we are adding a new script. In this dialog box, RStudio also gives you a summary of what you are changing to the GitHub repo. In this case, because it is a new file, the entire file is highlighted as green, which highlights the changes.
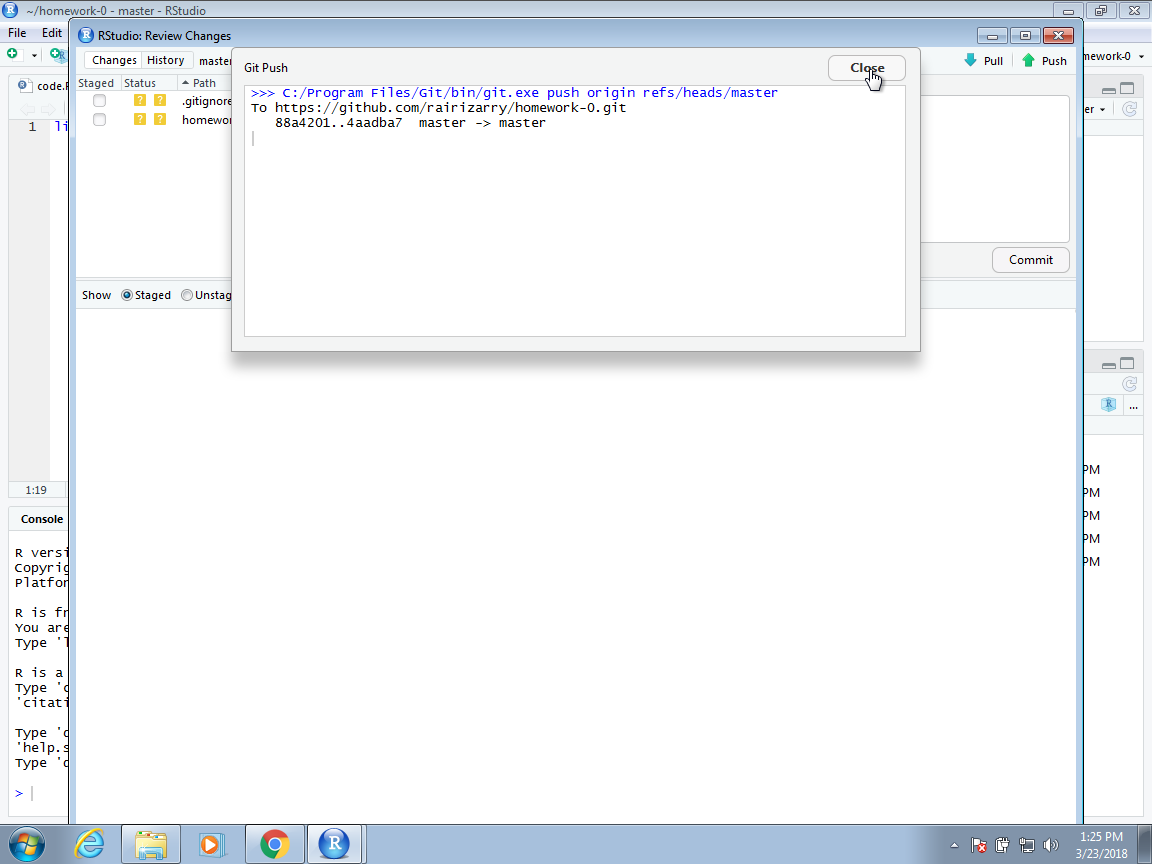
Once we hit the commit button, we should see a message from Git with a summary of the changes that were committed. Now we are ready to push these changes to the GitHub repo. We can do this by clicking on the Push button on the top right corner:
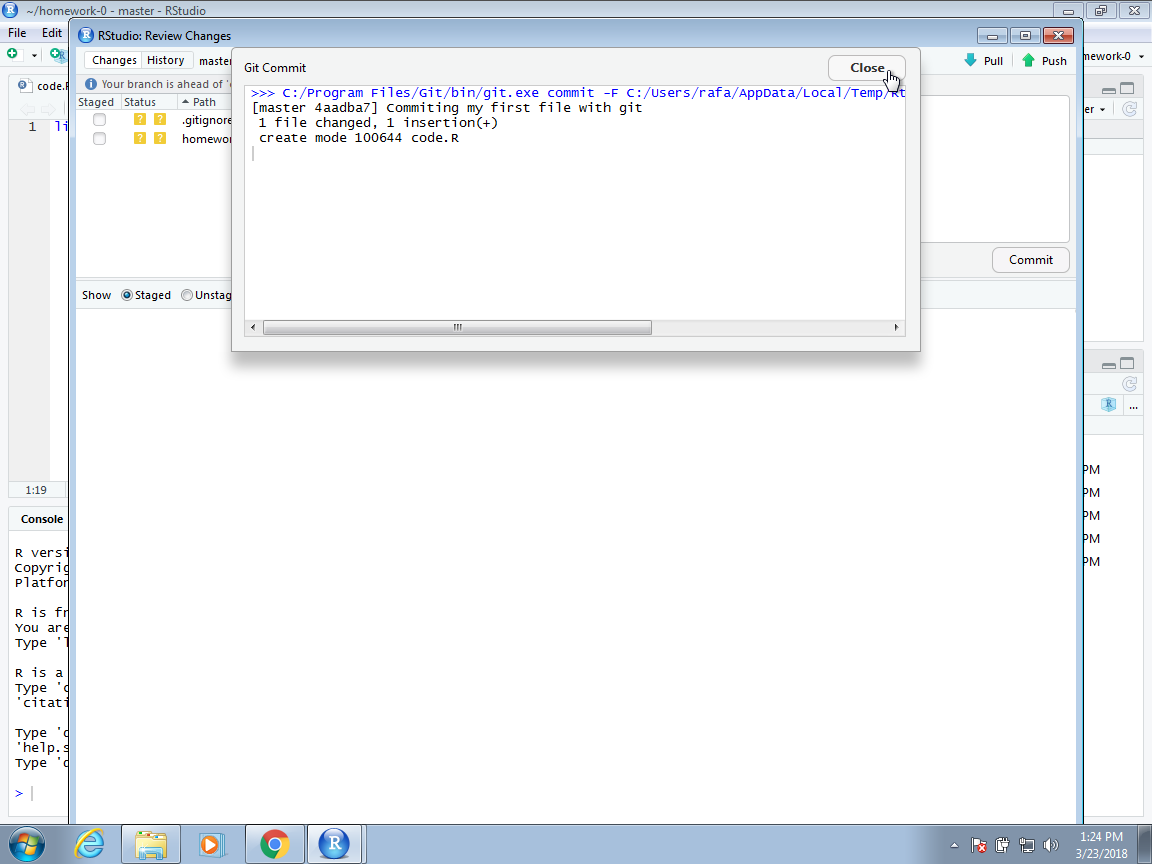
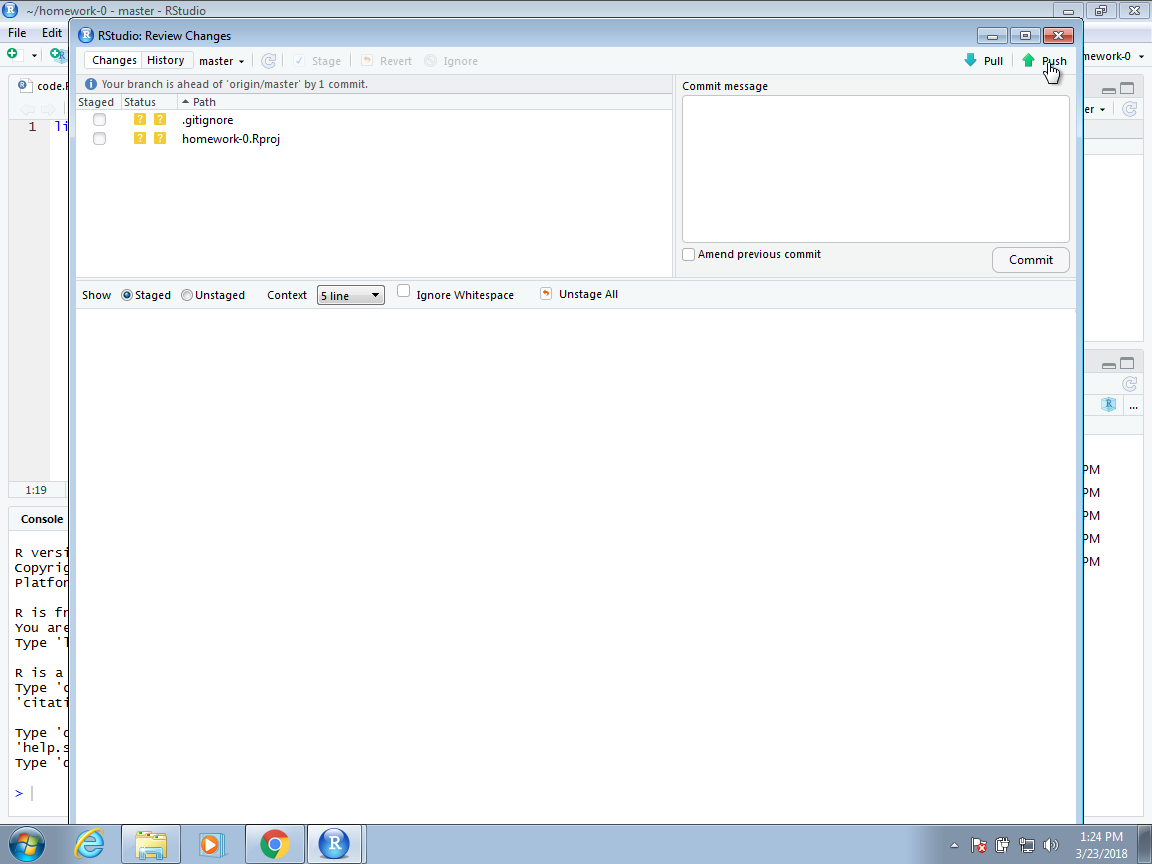
We now see a message from Git letting us know that the push has succeeded.
In the pop-up window we no longer see the code.R file. This is because no new changes have been performed since we last pushed. We can exit this pop-up window now and continue working on our code.
If we now visit our repo on the web, we will see that it matches our local copy.
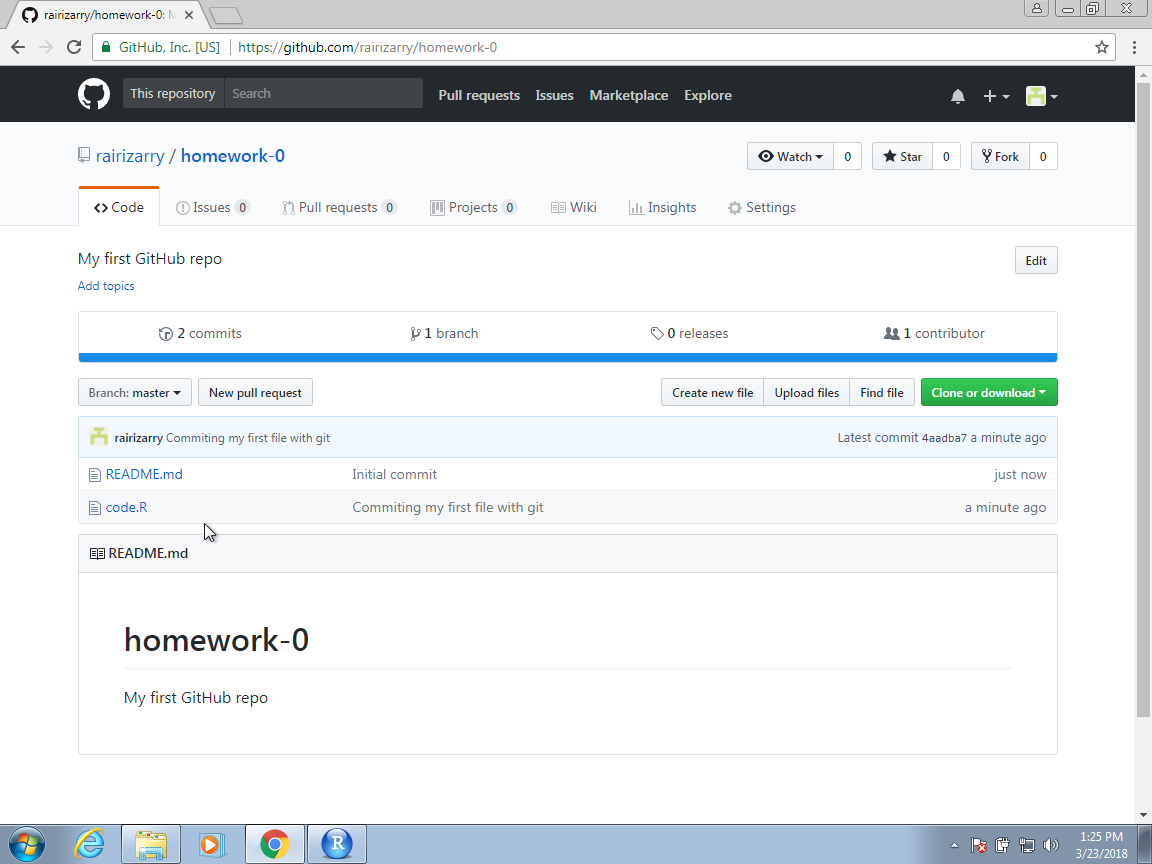
Congratulations, you have successfully shared code on a GitHub repository!